Tuesday, November 30, 2010

Back Bay Blah to City Chic - The Finale

Well, we weathered the storm - literally!  The rains still came, but the leak held. Now we can finally do the install!

The client chose a wonderful king sized sleep sofa from American Leather.  It was covered in a very soft, velour fabric - Gibson Stone.


American Leather's Gibson Stone


To jazz it up a bit, pillows were covered in Pindler P4634 Mitchell in Rust.

Pindler P4634 Mitchell Rust

 
Duralee 31832 in Black Walnut 629, a nice strong masculine fabric with a geometric design was used on the chair and ottoman next to the sofa.

Duralee 31832 in Black Walnut 629

Chair sneak peak!
One corner of the room was dark, so we chose a rust patterned fabric from Pindler for a chair, to brighten up the space.

Pindler 9893 Samir in Beaujolais

It was bright, but not this bright!


A nicely patterned rug on the floor ties all the colors in....


And the unveiling..........                                BEFORE.............


                                                                         AND AFTER....


                                                                             KITCHEN BEFORE......


                                                                         AND AFTER.....


Not bad, if I do say so myself! The customer still wanted to keep some of the old furniture pieces for sentimental reasons, so we worked them into the design.   Jonathan, the contractor is still my hero for getting the construction done on time and on budget and the customer was pleased with the end result.  Life is good!

"Attitude is not about whether the glass is half full or half empty, it's about who is paying for the next round." - Unknown

Monday, November 22, 2010

Back Bay Blah to City Chic - Part 2

My last post gave the preliminaries on redesigning a bachelor's Back Bay condo.  For my readers not famililar with the Boston area, the Back Bay is a very nice section of Boston near the Charles River consisting of many Victorian brownstone buildings in the residential section and taller "mini skyscrapers" in the commercial section.  Curious as to why its called "Back Bay" when its near a river??  Years ago, the area was actually a bay off the Charles River.  In 1857 the city started to fill in the tidal area and it doubled the size of Boston!  Try doing that today with our EPA regulations! Was the area already so crowded in 1857 that they had to fill in a bay to house everyone??  Sorry, I am so totally off track here!

The condo destruction moved along nicely - carpet was ripped out, the kitchen was dismantled.  My client and I were feverishly emailing and snail mailing fabric, furniture, granite and flooring samples.  And I have to say that decisions were made pretty quickly.  My client spent a Saturday afternoon shopping at Home Depot for styles of cabinets and granite he liked while he was on the phone with me!  He gave me the stock numbers and I checked them out online and gave my opinions.   Parallel shopping at its best!

Condo in process
One thing I neglected to mention in my last post... two of the window frames had sustained water damage due to a leak in the outside brick a year ago.  The building management assured us it was all fixed, so Jonathan (Boston Building Doctors)  and his crew scraped away the old bubbled paint and sanded and repainted the sills to gleaming perfection!

Bubbled paint on window frame

And then the rains came........


The particle board revealed...


Frame cave in

Not only wasn't the original leak fixed, but with all the spring rain we had, the leak turned into a gushing river pouring through the particle board (yes, I said particle board) window frame.  The top part of the frame turned to mush and caved in.  The "Spirit of the Bay" was coming back in a big way,  exacting revenge for being filled in! (Sounds better than "It rained and we sprang a leak!")  As for the particle board (yuk and double yuk!),  this was part of a rehab done years ago.  To change the windows now  would be a huge procedure involving the housing authority because the condo was in an historic district.  Building management again went out and repaired the leak.   So we let the windows dry out for a month, repaired again, and kept our fingers crossed....

In the meantime, furniture, appliances and cabinets were ordered, paint was chosen and everything seemed to be moving along pretty smoothly...

And then the rains came....again....

Window Frame - intact!


Luckily, the finger crossing worked!  No leaks!  (Alright, maybe some credit is due to building management for actually fixing the leaks.)

During a construction job, there are bound to be unforeseen problems.  A good designer doesn't panic.  You just deal with the problem and move on.  Fortunately, in this instance, it was not attributed to anything I or my crew did.  (It was all Mother Nature's fault!  Blame her!) 

Next week...the finished product!

For all my readers, this is the time of year when we all reflect on the good in our lives and give thanks for our blessings.  Happy Thanksgiving!!

Monday, November 15, 2010

Back Bay Blah to City Chic - Part 1

One of  the most challenging projects I worked on this year was a bachelor's condo in Boston that was decorated in a "post college - but not entirely grown up" decor.  The challenge was that the owner lived in Ohio, but this condo was in Boston. He used it several times a year and he always let friends or family use it when they were in town.   We only had one face to face meeting during the whole project.  Everything was done by email or "parallel shopping".  Parallel shopping is my term for going to a chain store (Home Depot, Pottery Barn), picking out items I think would work in the space, then have the client go to his or her store in their location and check out the items in person.

On our only face to face, I took several pictures and talked with the client about his vision for the condo.  In his fifteen years of ownership, nothing had changed.  He wanted to have the carpet ripped out and install hardwood in the living room and hallway, tile in the kitchen, new cabinets in the kitchen and a new sofa for the living room.  By the time we were done talking and proposing, we were now basically going to gut the entire condo and order new furniture!  Hey, why have a scrambled egg when you can have an omelet??!

This was my first time doing more than just "decorating" in Boston.  Parking, building permits and the logistics of hauling stuff up in elevators was a little out of my league.  My usual contractor very graciously gave me an estimate for work, but the thought of working in Boston scared him as much as it scared me!  Just my luck!  There was a contractor currently doing work in the building.  Jonathan Moretz  from Boston Building Doctors ( www.bostonbuildingdoctors.com ) not only knew how to navigate the Boston building codes, he had done so much work inside the building that he pretty much knew what was behind each wall and what the building required as far as flooring, noise control, trash disposal and elevator scheduling.  AND, his price for the renovation was reasonable.  Jonathan, you are my hero!

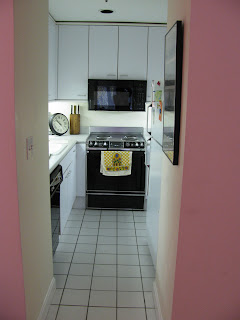
Kitchen - Before

Skinny Kitchen!!

The kitchen was an issue unto itself!  Long and narrow and only 3 feet of space between each side.  The refrigerator handle stuck out too far into the small space.  The microwave was so low to the stove that it wasn't code.  Under cabinet lights were bulky and the white plastic had yellowed.  Any improvement here was going to be a big improvement!!  We talked about changing the layout a bit - moving the refrigerator to the back of the room to open up the space and moving the stove to the side bank of cabinets to make this a true galley kitchen instead of a u-shaped.  There would be better use of space and cabinets.  In the end, the client opted to keep the layout as is so he wouldn't go over budget with the "unknowns behind the walls".


Living Room - Before

"Dorm room look!"

The living room was in serious need of furniture with a more pulled-together look.  There were too many small pieces that had no purpose, the poster art was hung "willy-nilly" on the walls, the walls were white, the sofa - white, the chair was dark green and the window blinds were mauve.  And don't look up because there was some hideously yellowed track lighting on the ceiling!!  Need I go on??  Too painful to talk about!

The bedroom wasn't bad.  A new coat of paint, new carpet and we were good to go.

In the next several weeks, I put together floor plans, furniture and fabric suggestions, cabinet and appliances options and Jonathan and I met several times to discuss the destruction and construction of the condo.  It was January and all this had to be finished by April!  Yikes!  ( Let's see if Jonathan will still be my hero!)

Next week - "the process"!

"A house pulled down is half rebuilt." - Proverb

Monday, November 8, 2010

Inspiration...

In her latest blog,  good friend, and fellow design  blogger, Yvonne Blacker, asked the question, "Where do you look for inspiration?"   http://designvignettes.blogspot.com/2010/11/where-do-you-look-for-inspiration.html.  Great question!!  Everybody needs inspiration, whether its in an artistic  field, medical field, educational field.  We all need something to get the brain juices flowing!

So I pondered the question with respect to my own life and career.  While I don't have "heroes" in my life, I always look towards people I know who are going through an extremely difficult time - whether its health, career or family related.  It puts all my little "bitchin's and moanin's" in perspective.  If they can get on with life, I certainly can!  When I was pregnant with my daughter, I developed diabetes.  I was hospitalized so they could regulate my blood sugar and teach me how to give myself insulin injections.  "You want me to stick a needle in my thigh and prick my fingers how many times a day???" " No thanks, I'll pass!"  Then I remembered a friend's granddaughter who was 5 years old and able to inject herself.  Her condition was going to last a lifetime, not just the next three months.  Ok Self,  suck it up and get on with it!  She was my inspiration that day.  And, you know, once you did the initial stick, it didn't even hurt!

In my design business, I look around a client's home for that one "spark" that will get the design ideas rolling.  It may be a piece of furniture, a color on a piece of pottery, an architectural detail in a room.  In previous posts, I looked towards the colors in nature...my travels... a pet.  I guess our life and experiences are our best  inspiration!

My first client, Chris, (who didn't know she was my first client!) hired me to pick the paint colors for the home she was moving into. I had to do some quick thinking on my feet to dazzle her with my design brilliance so she wouldn't know I was a novice.   She had this wonderful room with a hexagonal cut-out in the ceiling.  It almost looked like the dome of an observatory.  We decided to paint it a pale blue-green so it looked like you were looking through a portal to the sky.  She also loved the sleeves of my jacket - a worn out, brown leather bomber jacket.  That became the inspiration for the sofas!  We found a great red striped fabric that added punch and  tied in all the colors and voila!  Family room done!


Well, maybe not that easily, but once you have the basics laid out, the rest usually falls into place.

I guess my initial inspiration to go into interior design came from other people's homes.  I would find myself asking, "If this were my home, what would I do with it?"  Then I would plan out (in my head, of course) how I would change colors, change furniture, change traffic flow.  I took an adult ed course on interior design and that was it!  Full steam ahead! Get the degree! Get into the business!  I had found my calling!

So. my readers...I put the question out to you...."Where do you go for inspiration?"  I would love to hear your answers! 

I certainly don't regret my experiences because without them, I couldn't imagine who or where I would be today.  Life is an amazing gift to those who have overcome great obstacles, and attitude is everything!" - Sasha Azevedo (American Actress, Athlete and Model)

Monday, November 1, 2010

Table Top Tips for Turkey Day

Looking out my window and taking in all this gorgeous fall color reminds me that the holidays are coming fast, so I'm taking a break from watching design shows to focus on some quick tips for setting a pretty table for Thanksgiving and any other events you are having this fall.

New England Autumn

According to my father in law, "If you can't eat it, it doesn't belong on the table."  Ok, Dad, how about we compromise and combine the edible with the inedible??

One idea I have used for different holidays - I have a pair of tall candle holders with glass bowls on top.  The glass is lovely, but with just a small candle inside - its lacking.  I fill the bottom of the bowl with something in the colors of the season and nestle the candles inside. A regular glass bowl will work just as well.  Assorted nuts or multicolor color beans they sell for soups make a great base that you can use with an orange or rust colored candle for the fall.  For Christmastime holidays, I have used fresh cranberries,  red or green jelly beans or mini pine cones.  Just remember to use tea lights or small candles that have some kind of enclosed bottom so you don't end up with a waxy mess to clean up.  And make sure that whatever you use will not catch fire or melt!  (The M & M idea didn't work out so well!)

Candlesticks with some fresh oregano sprigs!


Berry sprigs and candles

 Waxed gourds in a pretty, low basket will look very festive when flanked by several brass candlesticks.  Add some mini dried corn cobs or leaves from the backyard as an accent!  Or how about a brass bowl filled with fruit and nuts?  Oranges, apples, pomegranates, pears - sit them on a bed of walnuts or chestnuts and you have a display that is not only beautiful, but will serve as one of the courses of your dinner!

Fake leaves don't make a mess and never turn brown!

Or you can read my first post, entitled "Lighten Up!" where I talk about using herbs as centerpieces.   http://thefocusondesign.blogspot.com/search/label/Seasonal


The centerpiece is only half the battle!  I like to try to mix it up with my table linens.  I like a solid color tablecloth with pretty patterned napkins. Or coordinate different patterns - florals and stripes go well together.  I even have napkins that are floral on one side and stripe on the other! Roll 'em up, fold 'em up!  Use napkin rings! Use old bracelets or jewelery to adorn them! Use your imagination!


If you have good china that justs sits in the cabinet - use it!  It's just as easy to set a table with the good stuff, as it is with the everyday ware.  There are just too many pretty pieces of china out there sitting imprisoned behind glass doors because we are afraid that if we use them, one of them may break.  So what?  Once they break, you can add in other pieces that coordinate. The best looking tables are ones that aren't so "matchy-matchy".


And don't forget to dress up the food!  I sometimes dip grapes in raw sugar and put those around the turkey platter.  Maybe its a little too "Martha Stewart", but everyone oohs and aahs and the grapes get eaten! 

Remember that the best things about your holiday table is not what's on it, its the people around it.  They add the spice, color and flavor to your life!

"We tend to forget that happiness doesn't come as a result of getting something we don't have, but rather of recognizing and appreciating what we do have."  Frederick Keonig

Amen to that!!